You might remember a few months ago when my favorite blogger at Young House Love put out a call to her readers for a Pinterest challenge and I answered. Well, it’s that time again. Last week, Sherry announced round two of the Pinterest challenge and I was all too happy to get involved. On the surface, the challenge is quite simple – choose something you’ve pinned, try to recreate it putting your own spin on it, and share it with the world.
For a while now, I’ve had my eye on a particular pin that welcomed the Fall spirit and Thanksgiving season and the challenge was just the thing to get me going on this project. First, check out my inspiration photo:
The original creator used recycled root beer bottles and vinyl letters (much easier than the route I took – see below) made on a Cricut machine. To see her detailed instructions, simply click on the photo above to be taken to the original post at choosetothrive.blogspot.com.
Step #1: Collecting Supplies
The supplies I used were amber colored bottles, painters tape, acrylic paint, Hard Coat Mod Podge, a sponge paint brush, a crafter’s knife, and a selection of dried wheat and other flowers. The first items to gather were the bottles. Darrin was all too happy to play his part here. I was able to collect six Samuel Adams bottles, however, after Darrin brought home a pack of Sierra Nevada pale ale I decided that I liked the shape of the Sierra Nevada bottles better. I saved the Sam Adams bottles for another Pinterest inspired project down the road. I found that removing the labels from bottles can be quite easy. I only had a couple bottles to clean at a time so I would let them soak in hot soapy water while I was doing dishes. By the time I was done washing all other dishes, the glue on the bottles was weakened to the point that I could easily peel off the labels. I then scrubbed any excess glue from the outside of the bottle, rinsed it, and left it to air dry.

Some of my starting supplies: six clean bottles, a craft knife, painters tape, and letters. Notice the clean bottles.
Step #2: Preparing the Stencil
After collecting and cleaning my bottles, I needed to prepare my stencil. I do not own a Cricut machine so I needed to be able to paint on my letters. I first chose a font I liked (Harrington) and printed out my letters at my preferred height and width. Next, I cut out each letter. Then using painters tape, I taped off a section of the bottle, careful to make sure the area I taped was about the same height on each bottle.
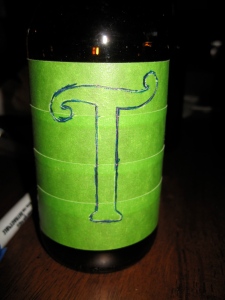
I then positioned one of the letters over the taped surface where I wanted it on the bottle; I secured the letter with two small pieces of painters tape (the painters tape worked well because I could reposition it as necessary). Using a thin marker, I outlined the letter. When the letter was outlined, I used a craft knife to cut out the letter from the tape on the bottle. What remained was a stencil of the letter on the bottle. I repeated each step on every bottle.
Step #3: Painting the Letters
Once I had the stencils completed on all of the bottles I was ready to paint. I used acrylic paint and mixed a little yellow into white paint to create a light butter color. I was concerned that plain white might be too bright against the amber of the bottles. I then mixed in a little Hard Coat Mod Podge to ensure that the paint would stick to my surface over time. Next, I used a sponge brush to apply the paint to the bottles with a light tapping motion to give it an even coating.
After a few hours of drying, I very carefully removed the painters tape on the bottle. There were some areas where the paint on the bottle and the paint on the tape were stuck together. So, when I tried to pull the tape, the paint on the bottle tried to come off, too. Since the paint was still soft, I was able to place my finger on the paint on the bottle and pull the tape away. This worked to separate the paint and made sure that the paint left on the bottle would stick. The next day, all the paint on the bottle was secure and there was no sign of peeling.
Step #4: Adding Decorative Flowers
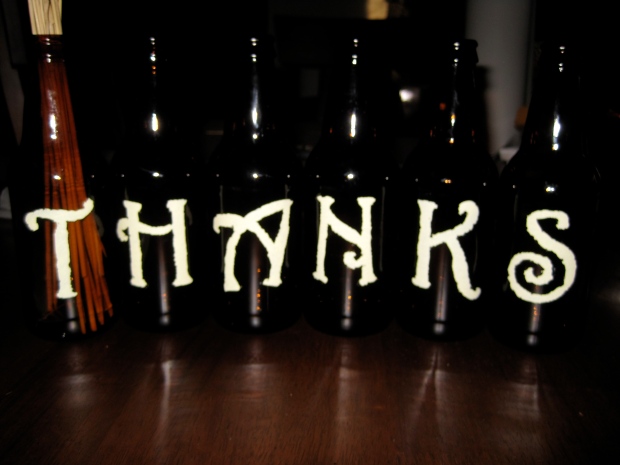
The final step of this process was to add the floral decoration. The inspiration photo used stalks of wheat in each bottle. However, when I went to the craft store to buy the wheat, I was inspired by the different colors and shapes of dried flowers they had for sale. All I had to do was trim the stalks to my desired height before inserting into the bottle.
I’m so proud of how this turned out. I love the warmth this brings to our mantle, which is naturally cool in tones. I’m also thinking of bringing this decoration back out for our wedding next year, since it will be an early fall wedding. I can see this display on the sign-in table or somewhere where our guests can see it so they know we are thankful for their attendance and for sharing in the special day with us.
As far as costs, the only thing I spent money on was the wheat and flowers. I bought them at Michaels and I used a coupon! The bottles were recycled, I already had the paint, glue, craft tools, and painters tape. So, all in all, I’m also quite pleased with the cost of this project. If someone had access to wheat on their property, I’d think they could pull this project off for close to free.
What do you think? Do you have any projects you’re working on that you’re particularly proud of? Share! Share!
Also, be sure to check out what the pros produced during this round of the challenge. Visit Young House Love to see Sherry’s homemade Christmas ornaments. Go to Bower Power to check out Katie’s antiqued window project. Erin over at House of Earnest made a super cool gold lined lamp. Finally, super-builder Ana White built a pocket bookshelf for a little girl’s room.


This turned out GREAT!
Thanks so much! And thanks for stopping by to check it out!
Love this Missy!